
In this article, Eiko Otake is introduced. If you’re not familiar with Eiko, she’s a choreographer from Japan, but most people view her as a performance artist/ mover who speaks out to the public through dance and gestures. She’s been all around the world putting on performances about her past and present stories. One of her famous works is A Body in Fukushima, where she performs for her photographer at the scene of where the Nuclear disaster struck in Fukushima, Japan. In this piece, she dances and moves on top of the rubble of the buildings where people once lived. This was a way of her to cope with the destruction and to cope with the lives that were taken. I wanted to speak about Eiko because I met her personally when she came to Alfred NY for a performance. I had a chance to see her up close and personal and got a sneak peek of how she works. She’s a very interesting women who’s seen it all and carries all the places she’s been through her work. This article explains her life and what her work consists of.
The Red High Heel Project
 Final Project:
In Foundations in our colab class, we were assigned our last final project! Our task was to do research on a certain artist we were assigned and see how we could collaborate our ideas with this certain artist.
Once we picked an artist, we had to take their idea and twist it into our own. We had to incorporate some sort of sewing our stitchery into the project such as, knitting, crocheting, embroidery etc.
So, here is how my idea started………
My Artist : Lenka Clayton
Who is she? She’s a British-American conceptual artist. I really like her work because it really makes you think and wonder, plus in a way she does some risky things and then documents them for her art work. I feel that most of her work is experimental, but some of her work can be very touching in a way…
One of her works consist of planning to write personal letters to everyone in the world. Which in my opinion, I think it seems impossible but would be very interesting if she could do so. So far, her and her partner Michael Crowe have already handwritten 2,700 letters. They did this in the residents of Cushendall (a small town in the Northern Irish Seaside.)
She explains that the letters were written in a friendly tone and they made some jokes here and there. Most of the letters talked about weather and people’s favorite T.V. shows. I’m pretty sure these letters were meant for people to wonder and interact with one another hoping they would talk to eachother and say “did you get that letter too? What did your’s say? Whos Michael and Lenka?”
Here are some of her letters…


My Project: The Red High Heels (Inspired by Lenka Clayton)
For my final project, I was inspired by Lenka’s Mysterious Letters and thought that I really wanted to do something that would reach out to people and make them feel something.
Then I had this idea of making small objects to send through the mail (in this case I chose key chains.) Then I kept thinking of what type of group of people I wanted to convey a message to.
My Idea:
I then processed some ideas in my head and came up with a solution. I wrote personal handwritten letters to 10 women in my life whom have inspired me and who have also helped me gain confidence in myself. I feel as if women need to start empowering one another and start giving eachother compliments more because it helps with our confidence.
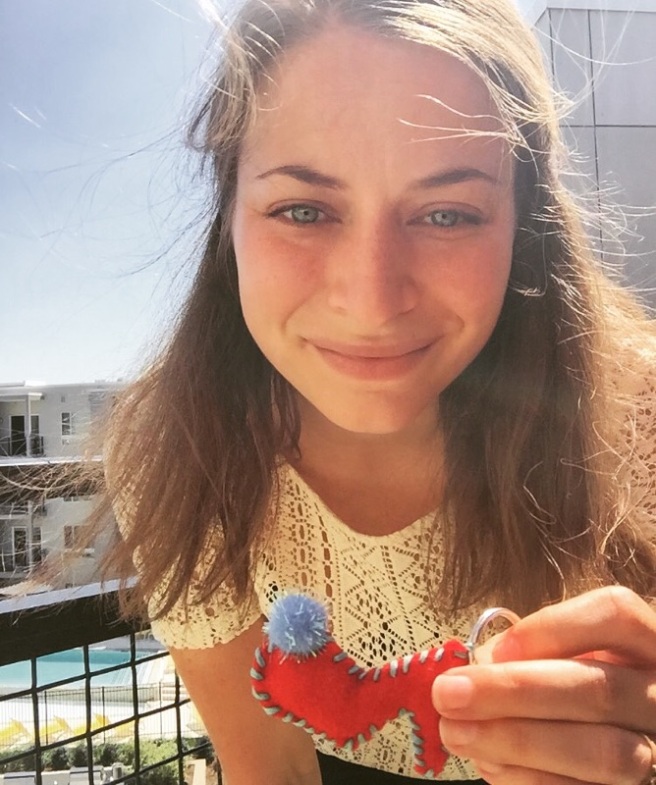
I then thought of an object that I could make into a keychain that would symbolize this idea of “confidence in oneself.” So I decided to make red high heel keychains because in my words “Every woman is confident while wearing red high heels.”
 (Here is an upclose image of the keychains I made.)
I really wanted to keep this idea flowing, so I gave each woman 2 keychains so she could also pass the other one on to another woman who has had a positive impact on their life.

 (I ended up hand sewing 20 keychains )


(In the process of making the shoes.)
Results:
I sent out 20 keychains and 10 letters to the women. My letter said…
“These are two key chains of red high heels which resemble a sign of confidence. Thank you for being an inspiration and for helping me gain confidence in myself. As women, I believe we need to start empowering one another. Please keep a keychain for yourself and give the other one to a woman who empowers you and to whom also brings out the best in you. All I ask is for you to take a picture of yourself with the keychain and please send it to me…”
I didn’t receive all 10 pictures yet but still have some to show…


It was so nice receiving these photos from everyone. They were really happy and touched by my letters and thought the keychains were a special way to be reminded of confidence.
I used these photos and made an instagram account for my project. Underneath each photo I put a caption of the person’s reaction to receiving my gift. Many of these women said it made their day and it even made one of my aunts cry (oops!) but i’m really glad they felt some sort of emotion to my project and i’m still currently waiting for a few more reactions 🙂

Black Out Poetry
Haven’t been on my blog in awhile but just to keep you updated with recent foundations projects…
In class, we went through old books and magazines and started to make our own black out poems only using words on the pages.
Eventually you have a brand new poem!
After that our task was to share our own poems to the community.
I decided to keep it simple and thought that one of the best ways for people to take time and read my poems would be while they were going to the bathroom!
Yes, I stuck my poems above the toilet paper in certain bathroom stalls; that way people can be entertained while going to the bathroom.
I put my poems in bathrooms in my dorm, Miller, Harder, Binns and other places around campus. 🙂


The Line and Our Comfort Zone : Final Project

So now the first block is over. It’s all bittersweet and I’ve definitely gained so much knowledge from the Line project we’ve been exploring these past few months. I really appreciate all that I’ve learned from the line and the fact that I’m growing as an artist and as an adult. I’ll for sure always remember this part of freshman foundations and the tedious work we were required to do for the line. But in the end, I really understand the meaning of the line. I’ve come to a conclusion that the Line is suppose to get us out of our comfort zone and help us find new influences. With that idea, I found inspiration…
The Final Project:
Astrid, Chessy and I teamed up and we came up with this concept of how the line makes us feel uncomfortable and makes us break out of our shell. We also realized that the objects in nature can relate to the human body. We collaborated our ideas and came up with a project that would relay a meaningful message. We decided to walk the Line in the nude. We thought this would be a risky idea because we are all uncomfortable with our bodies just like how the Line makes us feel.
So we did it! We walked the Line in our birthday suits (thank goodness our part of the line was deep in the woods.)
We then documented our experience with a video and photos but realized that wasn’t good enough. We wanted more meaning behind the fact of us showing our bodies. This is when we developed a new and improved idea of relating our so called “flaws” to the Line and in nature.
Despite the fact of the pouring rain; we also had a better solution of moving our photo shoot inside. We really wanted our viewers to see and understand our concept more clearly. We took pictures of each other showing off skin and our impurities of our bodies/face. Then we walked our section of the Line and took more photos of objects in nature to compare to our flaws (as shown below.)
We’re normal girls. We hate our flaws and hate something about our bodies and we always do our best to hide it.
Here we go world…here are my flaws or so called “insecurities”
MY INSECURITIES:
MY NOSE
When I look in the mirror, my nose bothers me the most when it comes to my face. I just hate the way it sticks out and I try to make it look smaller by using makeup tricks. I also recently had my nose pierced and I’ve developed a real nasty piercing bump on my nose and it bothers me so much! I found fungus on a tree and that relates to the idea of something growing on a place where it shouldn’t be (relating back to my piercing bump.) I also found a bump on a tree to relate to the fact that I hate how much my nose sticks out.


MY BODY TYPE
I have a petite body type and I have zero curves. I feel like I look like a box when I compare myself to curvy girls. I always wanted curves but never developed them due to the fact that I lack space between my ribs and my hip bone. It really frustrates me. On the Line, I took photos of trees that were really straight and had no curvy shapes to them. This relates back to my body type.

MY TINY BOOBS
My breasts are pancakes! It bothers me so much. Every time I wear a t-shirt, I feel like a boy. I feel as if I don’t look feminine enough due to the fact that my boobs are so small. I found items in nature that relate to my breasts such as a small snail on a tree, a tiny pinecone and a small next to a big tree (to show that I always compare myself to other girls.)

THE EXPERIENCE:
Even though at times I felt very uncomfortable processing this project, I also have better insight. I feel more confident in myself and after taking those photos with Astrid and Chessy, I also feel that I can accept these flaws I have.
This project also opened new doors for me. I’m starting to fall in love with videography and putting together footage.
but the best part of the experience is doing this project with new friends I’ve made. I’ve learned more about Astrid and Chessy and how we’re alike but different at the same time. They are awesome to work with and they keep me on task. We’ve shared many laughs and memorable moments while documenting and creating this project. We also developed trust in each other and that means so much to me.
(Thanks for being awesome people to work with!)
below is our documentary on this journey:
Group Territory Project

This week’s assignment was a group project- Chessy, Astrid, and I were assigned a section of the line (section 15) and had to do a total of nine explorations. Three explorations to measure the line, three explorations to gather research on the line, and three explorations to generate new knowledge from the line.
Measurements:
(1) We measured the line in different dance poses. I posed throughout the length of our section.
(2) We measured the line with one of Chessy’s favorite songs- “Feeling This” by Blink-182. It played about 3 times in our section.
(3) We measured how many different trees were included in the width and length of the line in our section. We lost count after multiple tries. 😦


Research:
(1) We collected about 30 different sounds of us interacting with nature by making noises. Some noises were completely human generated while others were in collaboration with trees, leaves, branches, etc.
(2) We researched different methods of traveling the line to see which was best (it was still walking). Different methods included skipping, hopping, rolling, somersaulting.
(3) We ventured into the woods at night (heard some scary noises) and researched different ways to experience the line- we decided to make it more challenging by walking at night and disabling ourselves. I walked in heels, Chessy blind-folded herself, and Astrid was tied up at her hands and feet.
Generation of New Knowledge:
(1) I walked with a mirror in front of me so I could experience the line behind myself while walking forward.
(2) Each of us climbed a tree and sat at the top for a while in order to see the line from a different (higher) perspective.
(3) We went camping!!! This allowed us to experience the line at night (which was really scary) and also gave us an amazing opportunity to watch Sunday’s lunar eclipse.

Here’s the link to our video on youtube! Check it out:
The Word Block Continued…

So parents weekend was wonderful. It was so nice to see my mom and dad. Of course I showed them all my work and I actually had them help me with this project.
Going back to last week, we all had a word and had to explore our word. I had the word “block” and I just walked around campus to find things that represented a block. Well, recently, this project was expanded…
Our task was to walk the line and start three collections that symbolized our word. Now, I had a simple word but it was still difficult because I had such a vague word! I kept my eyes peeled for block formations, for color blocking and pretty much anything that had to do with blocks! With the help from my mom, we walked the entire line and picked up random objects we found.
With those objects I decided to build an actual block (as shown below.) I used sticks as the main structure and then glued the random objects on such as rocks, paper, a glass bottle etc. I chose to do this to show the simplicity of the word and how you can find any item and turn it into anything you want.

I then had some flashbacks of when I was a kid. I use to love to play with blocks at my grandmas house. I could use my imagination and build anything I wanted. This then inspired me to find rocks that looked like blocks (accidental rhyming). I then painted them the primary colors of RYB to resemble children’s blocks.

As I was walking the line I also noticed how all the buildings are made with blocks and how most things around me had a block structure. So I decided to collect that idea by taking some photos of blocks all around me.


Instead of just focusing on the “block structure” I also recognized that blocks could be used in color!
for an example…


I tried to find types of “color blocking” on the line and took pictures of random signs and logos that represented this idea of blocks of color contrasting one another.
Word Definition
BLOCK
You’re probably wondering what the word “block” has to do with this blog post. Well, in my foundations class there were a bunch of words stuck to the wall and we all had to pick one word. The words are very random such as circle, symbol, economy, elements etc. With the word we chose, we have to define it. Not only give a description of the word but we need to explore this word! How do you explore this word? Well, I did some research online and I went around campus to find this word physically. Here is what I got…
DEFINITION OFF THE INTERNET
BLOCK: (noun) a large solid piece of hard material, especially rock, stone, or wood, typically with flat surfaces on each side.
or
(noun) the area bounded by four streets in a town or suburb.
or
(verb) make the movement or flow in (a passage, pipe, road, etc.) difficult or impossible.
or
(verb) impress text or a design on (a book cover).
As you can see; there are many definitions to define the word “block.”
Its funny to say, but there are blocks everywhere! You just have to look for them. It could go from cement blocks to even an action. There are also block patterns all around us such as tiled floors and bricks. I went on another little adventure and took pictures of thing a ma boppers that represented a block.

(chillen on a block)

(found me! sorry, bad photo quality)
BLOCK LIKE PATTERNS


I actually got lucky with finding block patterns, mainly because it’s such a simple pattern/structure that you can find anywhere. I walked around buildings and kept my eyes peeled for something “blocky” and I thought “wait a second, this whole building is made with a block like structure!” so that’s when I chose to get some pictures of bricks and cement.
SIMILAR WORDS
-Chunk -Cube -slab -piece
-Wedge -Brick -bar
BLOCK USED IN A SENTENCE
- The kids built castles made out of BLOCKS.
- The construction workers had to use a crane to move the cinder BLOCK.
- One of the players on the basketball team BLOCKED the ball from going into the basket.
![]()
This word is also used in logos


(close enough)
Exploring the Line
The Line Really Does Exists!

The line is an imaginary line that is a mile long and cuts through the entire campus at Alfred. We were all given a section of the line and were handed maps of where we were suppose to go. Some of us had to go explore in buildings, fields, hills, and I was placed smack dab in the middle of the woods.
Now, remember, this line doesn’t actually exist; it changes every year. So we pretty much have to estimate where the line is. Thankfully the map we had was helpful unless you were in the woods (which I was.) It was tricky to get the line right and we had to be very particular in which trees surrounded us.
We went out as a group and we decided to mark some trees with sticky notes so we could start to form an expectation of where the line would be. We eventually walked the entire line and went our separate ways. This is what I documented…

Entrance to the woods


Cool glass bowls I found! looks like some ones home
 Lava rock? Must be a volcano near by!

I spy with my little eyes…

Neat broken bottle I found


Going the right way! Creepy tree!


Squatchy area Found the line!

Old fuel can
More to come….
Stay tuned!!!!
Personal Territory Tour
LET’S GO ON AN ADVENTURE!

So let me explain the task. In my foundations class at AU we were told to find a personal territory around campus. It had to be a spot that was somewhat secret to us and we had to claim it. Once we picked our spots, we had to make a kit for someone that would eventually lead them to our territories.
We each received someone else’s “guide kit” and had to take their tour to their spot. We all got to pair up with somebody and go on 2 journeys. This is what I documented…
ASTRID’S TOUR


Me and my pair (Sophie) went on our friend Astrid’s tour. She gave us a small sized box with a picture of our destination on it and the Bible (fits in with the theme.) Within the box were directions to this place and pieces of paper with a pen to write with. We pulled out the directions and easily found our way to her territory. We came upon a white pristine church and we were just too anxious to go explore the place. We walked down the isle as we could heard our foot steps eco. It was so quiet and peaceful that you could even hear a pin drop.

She had the place all set up for us and left us a task. Her goal was to mainly make us feel relaxed, calm and to also self reflect on the church. We laid on the floor, studied the stain glass windows and just took deep breaths to get the scent of the church in our noses. We then wrote our thoughts down on a piece of paper about the church and were told to write our own poem. We decided to have some fun with it and just wrote down Hozier’s lyrics to “Take me to Church” because that was what came into our minds first. 
FRANCESCA’S TOUR

So Chesca’s tour was different than Astrid’s. Lets start by the fact that she used a bindle (as shown at the top of the page) as the tour kit instead of a box. It was fun to carry around as people gave us strange looks. But props to her because it was very creative yet amusing. 🙂
Chesca’s secret spot was easy to navigate to. She lead us to an abandoned building on campus. Approaching the building was hard, due to the fact that it was very creepy and both gave me and Sophie chills down our spines. We had to man up and follow her directions anyways. Our task was to sit on the front steps of the building and take in the smell of rotting wood and dead leaves. You could feel cold air spilling out of the crack of the doors. It gave us a feeling as if someone were watching us from behind.

Chesca also had a theme going on and had us listen to a song called “Haunted House” by Oh Hello. It just made the tour a whole lot creepier which was probably what she was going for. We were also told to sketch a monster or ghost that we think could live in the building. It was fun to use our imaginations. She also had pictures for us of the interior space of the building with facts on the back. It was pretty interesting to read all of them.


Thank you Astrid and Francesca! We had fun on your personal territory tours! 🙂
MY OWN THOUGHT ON MY PERSONAL TERRITORY


I have to admit; this was a pretty tough project but I had fun with it! I mean who doesn’t want to walk around and explore new places? I pretty much had to hike all around town to look for a secret spot. I found a bunch of places but it took awhile to find the right one. I came across a cool treehouse in the woods but realized that it was just a bit too far. I also came across some tunnels and alleyways but neither of those spots felt like “me”. Then I realized I had to explore just a bit harder. I ended up going in Repo to check out the place because I wanted to see what it was all about. I found a back opening and that’s when I saw the red bench and knew that this place could be my spot. It’s hidden, quiet and screamed “secret spot”. I sat on the bench and just observed all the nature around me. It symbolizes peace and quiet because I could finally hear myself think. It’s a good place to have some time alone so I can reflect on the days.


This is my tool kit. I made the flowers out of paper and I used some fun highlighters because why not make it fun and colorful? On the inside are instructions of what activities to do once at my spot. Some of the activities are quite amusing such as eating Warheads and taking a picture of your “sour face”. I tried to make the activities fun and a bit challenging. I also put in a map to get the person from point A to point B. I stuck some pictures in there as well. The pictures are of different landmarks and locations I took while on the journey.

These are some pictures I took while roaming to my spot. I thought they were important because it’s about the journey not the destination (but in this case it’s about both!)
Hunting Moby Dick
 Hi! My name is Morgan- I’m a first year foundations student at Alfred University. One of our first projects (in addition to creating this blog) was to take an short excerpt from Moby Dick and photograph the nouns in the passage. We weren’t simply taking a photo of the word, we were asked to find people, places, and objects that would literally represent our words and then photograph them. After we collected our images, we chose the best for each word and collaged them together. All the images were in black and white so that when each student (there’s about fifty of us) finished their collage, we could put the story back together in one big book. Of the fifty collages, no two were the same. Many of my peers created an entirely new atmosphere by filling their entire paper, while others used the white of the paper to create movement and space. Students also used sharpies, markers, and pens to add different dimensions and drawings to the image. This assignment asked us to solve a problem- how can we represent a single word with an image? How then can we relate it to our passage and best represent the images Hermon Melville initially created? Our professors forced us to think observationally and analytically as we went outside to photograph words like “Rome” and “spile” in the small, middle-of-nowhere village of Alfred. For words that are unheard of at our university, we had to change our way of thinking and our perspective in order to find a way to best represent the passage we were assigned. This assignment was, yes, frustrating, but allowed us to be creative in the way that we approached it.
Every page of Moby Dick illustrated:
http://www.brainpickings.org/2011/10/11/matt-kish-moby-dick-illustrated/
Five interesting things about Moby Dick:
http://interestingliterature.com/2012/12/08/five-facts-about-moby-dick/
Herman Mellvilles thoughts on art:
http://www.poetryfoundation.org/poem/182480
DESCRIBE PROCESS: Right away when I walked out the doors I went my own way and didn’t follow the crowd. I had my words written down in my journal and I went exploring. I had to keep my eyes peeled to look for these objects that I would use to represent my words. It was challenging to look for these certain objects. I had to search everywhere! I looked high, I looked low and I had to use my communication skills to find some extra help. I ended up walking around town and in the neighborhoods to look for some inspiration.
